Build a custom picture frame
Step-by-step guides for a wooden frame and a 3D-printed A3 frame, with a cut calculator, shopping lists for Reus and files you can print.
Before you start
No experience needed. A wooden frame takes an evening, plus a day for the glue to dry. The printed A3 frame is about 7 hours of printing and an hour of assembly.
Wear safety glasses when you cut, handle glass by its edges, and print in a ventilated room.
- Rabbet
- The step cut into the back of a frame that holds the glass, picture and backing.
- Miter
- A 45° cut, so two pieces meet in a neat corner.
- Long point
- The longest edge of a mitered piece. You measure from it.
- Dowel
- A small wooden pin that joins two parts.
- PLA, PETG
- Common 3D printing plastics. PLA is the easiest. PETG is tougher.
- 3MF
- A print file that remembers where each part sits on the plate.
Two ways to build
Both end with the same thing: a frame with glass, your picture and a backing, ready to hang. Pick the one that fits your tools.
- A wooden frameWood strips, a miter box and a clamp. Eight steps with a cut calculator. ·
- A 3D-printed A3 frameEight printed parts joined with wooden dowels, made on a Bambu Lab P2S. Ready-to-print plates included. ·
- Another size or styleSet your own picture size, ornament, printer bed and frame style, then download plates made for it.Open the frame editor
- VideosClear builds from other makers, in English and Spanish.
Materials · 1 of 3
The wood
One plain wood is enough. Ask for these by their Spanish names at the counter.
- Listón de pino o abeto cepilladoThe easy, cheap choice. Take 20–30 mm wide, planed on all four faces. Pick straight pieces by sighting down the length.Leroy Merlin · Brico Depot · Bauhaus
- Listón de roble, sapelly o hayaA finer grain for a better frame. Ask whether it is cut to length; most stores sell fixed lengths of about 2 m.Leroy Merlin · local carpintería
- Varilla o listón fino de 10 × 10 mmGlued behind the face strip, it makes the rabbet without a router. Two simple strips instead of one cut profile.Leroy Merlin · Brico Depot
- Rodapié macizoA skirting board can serve as a deeper, plainer face strip. Hold it up to the picture and see.Leroy Merlin · Brico Depot
Materials · 2 of 3
Glass and backing
These are the parts that must be exact. Have them cut for you, in millimetres, from your rabbet size.
- Vidrio flotado de 2 mm a medidaMost big stores cut glass to size at the counter. Ask for the edges to be "canto pulido" (polished).Leroy Merlin · vidriería in Reus
- Metacrilato o PETG de 2 mmLighter and safe to post or carry. Scratches more easily, so handle it by the edges.Leroy Merlin · Bauhaus
- Tablero DM o contrachapado de 3 mmThe backing. Also cut at the store. Foam board (cartón pluma) works for light pieces.Leroy Merlin · papelería · bazar
- A cheap ready-made frameTake the glass and backing from it. Reusing one saves money and waste.Bazar chino · IKEA Tarragona
Materials · 3 of 3
Small things
The cheap parts. The bazar chino near you often has them for a few euros and open late.
Shops: I have not checked stock at specific branches. Look up your nearest Leroy Merlin, Brico Depot or Bauhaus before you drive, and walk into the nearest bazar and glazier in Reus.
- Anillas en D, alambre, ganchosFor hanging. Small brass or steel D-rings with two screws, and a thin picture wire.Bazar chino · ferretería
- Puntas o grapas de enmarcar, cinta kraftHold the backing in. Flexible tabs or small brads, and brown paper tape to seal the back.Bazar chino · papelería
- Cola blanca de carpintero, lija 180 y 240Wood glue, and two grits of sandpaper on a block.Leroy Merlin · Brico Depot · ferretería
- Cera dura o aceite para maderaOne tin of hard wax oil, or "cera de abeja" (beeswax) for a softer touch.Leroy Merlin · Bauhaus
- Caja de ingletes, sierra de costilla, cinta métricaThe only tools that really matter. Look for a metal rule and a decent saw, not the cheapest.Leroy Merlin · Brico Depot
Step 1 of 8
Measure the picture
Measure the picture to the millimetre, width and height. Decide how much of its edge the frame will cover (8 mm is a good default) and how wide you want the frame to look.
Nothing to cut yet.
Step 2 of 8
Choose the wood
Pick one wood from the Materials section, such as pine, oak or ash, and a profile with a rabbet: the step cut into the back that holds glass, picture and backing. A face 15 to 25 mm wide suits most pictures.
Buy about 20% more than you need.
Step 3 of 8
Work out the cuts
Everything depends on one number: the rabbet size, which is the picture plus 1 mm of play. Enter your picture and moulding below to get the cut lengths.
Write the numbers down before you cut.
Step 4 of 8
Cut the miters
Set the saw to 45°. Mark the long point of each piece and cut just outside the line, then trim to it in thin slices. Cut the two long sides first, from the same setting.
Check each cut against the one before.
Step 5 of 8
Glue and clamp
Put wood glue on both mitered faces, fit a band clamp and check that the two diagonals are equal. Wipe off squeeze-out with a damp cloth. Leave it for 24 hours.
Add a brad or a spline only after the glue has set.
Step 6 of 8
Sand and finish
Sand with the grain, 180 then 240 grit. Wipe off the dust and apply one thin coat of hard wax oil. Leave knots and grain as they are.
One coat is usually enough.
Step 7 of 8
Glaze and fill
Clean both sides of the glass. Lay it in the rabbet, then the mount if you use one, the picture and a backing board. Hold everything with flexible points or tabs about every 10 cm. Check from the front before sealing the back with tape.
Dust trapped now stays there. Look twice before sealing.
Step 8 of 8
Hang it
Fix two D-rings a third of the way down each side and run a wire between them with a little slack. Hang the picture with its centre about 145 cm from the floor.
Done.
Step by step, in motion
Watch it come together
3D printer · 1 of 5
Print it, or build it?
Your P2S can make the whole frame, or only the parts wood does badly. Three honest routes, from the simplest to the most flexible.
Wood feels warmer. Plastic is exact. The best frames often use both.
- One printed pieceOuter size up to about 250 mm. One print, no joints, any colour. Ideal for small photos, postcards and gifts.Simplest
- Printed in segmentsRails joined with dovetails or pins, so the frame can be larger than the plate. Visible joints become part of the design.Any size · more assembly
- Printed corners, wood railsPrint four corners and fit store-bought strips between them. No miter cuts to get right, and the wood stays the star.Best for big frames
3D printer · 2 of 5
Will it fit the plate?
Enter your picture and a frame width. We use the 256 mm plate of the P2S, and keep about 3 mm free at each edge.
Enter your numbers.
3D printer · 3 of 5
Settings to start from
Starting points, not rules. Print one small corner first and test the fit before you commit to a big frame.
Clearance matters more than anything: leave 0.2 to 0.3 mm in every slot that something must slide into.
- FilamentPETG for strength and corners, PLA for clips and small frames, wood PLA for a warmer look. ASA if it will hang in strong sun.Dry it first
- Layers and walls0.2 mm layers on a 0.4 mm nozzle, 3 to 4 walls, and about 15 percent infill. Frames are thin, so walls do the work.Bambu Studio · standard profile
- OrientationPrint rails flat on the plate, with the face down. Layers then run along the length, where the frame carries load.Never on its edge
- WarpingLong flat parts curl. Use a brim, a clean textured plate and the enclosure closed for PETG. Open the door a little for PLA.Clean plate, glue stick
- Slots for glassAdd 0.3 mm to the thickness of the glass or acrylic, and 0.5 mm to the size of the picture, as in the calculator.Test with a scrap
3D printer · 4 of 5
Your P2S, in the frame
An enclosed printer with a 256 mm cube is a small framing workshop of its own. Use it where wood is awkward, and let wood do the rest.
The P2S takes parts up to 256 × 256 × 256 mm. Anything bigger is made of printed corners and wood.
- Corner keys and splinesPrint small keys that slot across a mitered corner. They hold the joint without nails and let the wood stay clean.PETG or PLA
- Glass clips and spacersTiny tabs that hold the backing in, and spacers that keep the picture off the glass. Exact to the tenth of a millimetre.PLA · 0.2 mm layers
- Corner connectors for wood stripsPrint four corners and join them with strips from the hardware store. This lets the frame be larger than your plate.PETG, stiffer and tougher
- A fully printed small frameUp to about 250 mm per part. With the AMS 2 Pro you can print a name plate or a relief in a second colour.Multicolour with AMS
- Hanging tabs and a name plateA printed keyhole slot, a label for the back, a small foot to stand it on a shelf.Any filament
3D printer · 5 of 5
Models to start from
Open these, check the licence, then change the numbers to your picture. Parametric means the model resizes for you.
- Parametric picture frame generatorPrint corners and connectors once; set rail lengths to match your artwork. Canvas clips hold it from the back.MakerWorld
- Customizable elegant picture frameA frame you can adjust to your own size and picture.MakerWorld
- Parametric picture frameA frame built in Fusion 360 that updates its stand to match the dimensions.Printables
- Parametric frame for HueForge printsMade for the filament-painted pictures you can print on the P2S.Printables
- Wood connectors for furring stripsPrinted connectors that clamp wood without screws. Check the metric version for 24×48 mm strips.Printables
A3 frame · 1 of 4
An A3 frame from a small printer
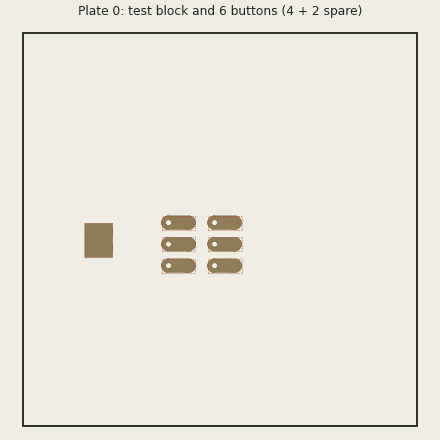
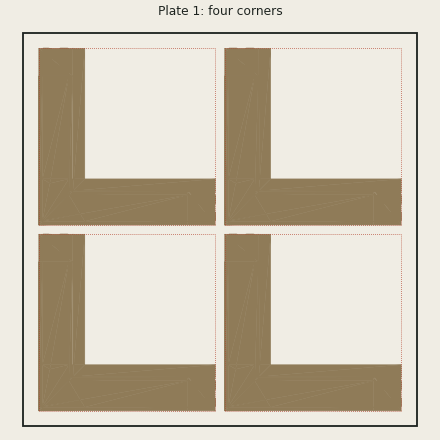
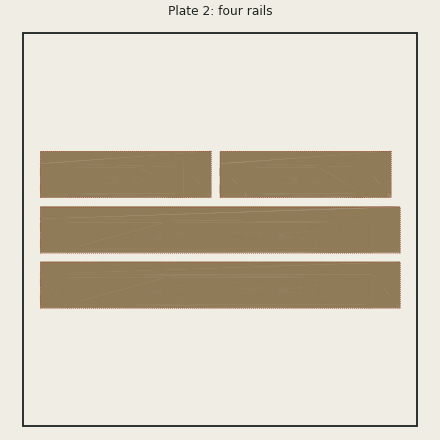
The plate is 256 mm. An A3 frame is 341 × 464 mm. So we cut the frame into eight tiles: four corners and four rails, each smaller than the plate, then join them with plain wooden dowels.
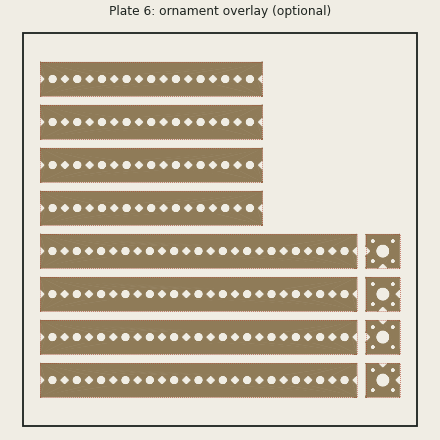
No miters to get right, and any picture size just changes the length of four rails. An optional pierced overlay glues onto the face for an ornamented look. Other sizes: open the frame editor.
A3 frame · 2 of 4
Print the plates
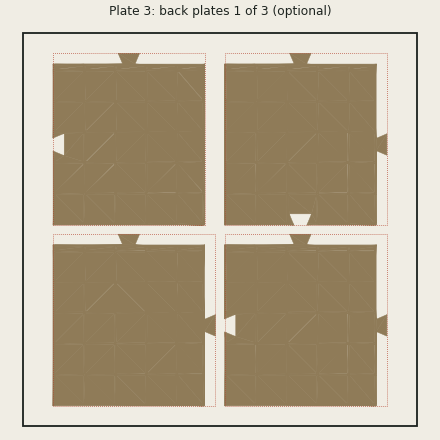
Open a 3MF in Bambu Studio and every part is already placed on the bed. For a first take use PLA, 0.2 mm layers, 3 walls and no supports, then slice. Print plate 0 first.
PLA is brittle and softens at about 55 °C, so keep a PLA frame away from sunny windows and heaters. Use PETG or ASA for a final frame. Sliced in PrusaSlicer at P2S-like speeds: the frame is about 207 g and 7½ hours, the back plates add 227 g and 7½ hours, the ornament 70 g and 4 hours.
A3 frame · 3 of 4
What to buy
A very short list. Everything is cheap, and all of it is at a hardware store or a bazar.
Check sizes against your picture. The glass and backing are 1 mm smaller than the picture so they never bind.
- Clavijas de madera, 6 mm × 30 mmSixteen wooden dowels. A packet of fifty is the usual size. Cut longer ones to 30 mm.Leroy Merlin · Brico Depot · ferretería
- Cola blanca de carpintero or epoxyFor the dowel holes. Epoxy or cyanoacrylate bonds plastic to wood best.Leroy Merlin · bazar chino
- Acrylic or glass, 2 mm, 296 × 419 mmCut to size at the store. Acrylic is lighter and the safer choice for a big frame.Leroy Merlin · vidriería in Reus
- Backing: printed, or a 3 mm boardPrint the twelve back plates, or buy plywood, DM or foam board cut to 296 × 419 mm.Leroy Merlin · papelería
- Screws, screw eyes and wireFour 3 × 8 mm wood screws for the buttons, two small screw eyes (cáncamos) with a thread of 7 mm or less, and picture wire. Longer screws would come through the front.Bazar chino · ferretería
A3 frame · 4 of 4
Assemble it
Project · 1 of 2
A set of three
One detailed scene cut across three A3 frames: a floating island, a small robot with its rocket, and a ringed planet. It is an AI-generated sample in a polished game-art style, with an original character.
Each panel is about 860 px wide, roughly 74 ppi at A3. That is fine for a first look. For a wall piece, enhance it 4× in the studio or use a higher-resolution render, and check sharpness there first.
Open this set in the frame editorTry the picture in the studio



Project · 2 of 2
Plan the set
What three A3 frames take, from the frame editor and a real slicer run. Treat the times as a guide.
Hang the three at eye level with about 6 to 8 cm between frames, so the scene reads as one piece.
- Three plain framesAbout 620 g of PLA and 22 hours of printing, on 6 plates.Modular, A3
- Add star ornamentsAbout 220 g and 13 hours more. Print them in a contrasting colour.Optional
- Print the backs tooAbout 680 g and 24 hours more. Or buy three backing boards.Optional
- Hardware for the set48 dowels, 12 small screws, 6 screw eyes, three pieces of acrylic or glass and three backings.Leroy Merlin · ferretería
- The picturesPrint each panel at A3 on matt photo paper. Each frame covers 8 mm of the edge.Studio · local print shop
Watch · 1 of 4
Wooden frames, in English
Four clear builds. Watch one all the way through before you cut anything.
Videos by their makers, linked and not ours. They load only when you press play.
Watch · 2 of 4
Con las manos, en español
Marcos de madera con caja de ingletes y herramientas sencillas.
Videos by their makers, linked and not ours. They load only when you press play.
Watch · 3 of 4
Fewer tools
No big saw, no problem. A hand-tool frame and a simple jig for repeatable cuts.
Videos by their makers, linked and not ours. They load only when you press play.
Watch · 4 of 4
For your Bambu printer
Joining printed parts, and mixing printed connectors with wood. The ideas that carry over to frames.
Videos by their makers, linked and not ours. They load only when you press play.
Tools you need
- Miter box and fine-tooth sawOr a hand-held miter guide.
- Band clampPulls all four corners at once.
- Steel rule and squareMetal, kept for this only.
- Wood glue, sanding block, wax oilA small tin lasts for years.
- Glass, backing board, pointsA glazier can cut to size. Asking for help is fine.
Now hang it.
Questions about a frame or a print? amplada.com